


Materials
- White yarn. (I think 1 skein of Red Heart Super Saver Solids should be enough.)
- Black yarn. (I used Red Heart again.)
- Red yarn. (Also Red Heart!)
- Size H crochet hook.
- Big yarn needle.
Note: This pattern is done in rounds. Do not join. Mark the first stitch of every row. Crochet in both loops, unless otherwise stated.
Pattern
Nose
Using black yarn,
Sc 5 in a magic ring (or ch 2, 5 sc in second ch from hook).
R1: 2 sc in each sc around.
R2: 1 sc in each sc.
Finish off and leave a long tail to sew on.
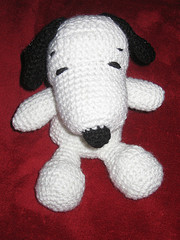
Head (working from nose to back of the head)
Using white yarn,
Sc 8 in a magic ring (or ch 2, 8 sc in second ch from hook).
R1: 2 sc in each sc around
R2: *Sc 1, 2 sc in next sc*, repeat around
R3 - R11: 1 sc in each sc around.
R12: In the front loops only: *Sc 1 in next 3 sc, sc 2 in next sc*, repeat around.
R13: *Sc 1 in next 4 sc, 2 sc in next sc*, repeat around.
R14: 1 sc in each sc around.
R15: 1 dc in each of the next 12 sc, then 1 sc in each sc until the end of the row.
R16: *dc 4, dc2tog*, repeat 3 times.
R17: *Sc 4, sc2tog*, repeat around.
R18 - R20: Sc 1 in each sc around.
R21: *Sc 3, sc2tog*, repeat around.
Note: At this point, you might want to attach your nose. I prefer to work with an "open" head, so that I can hide all my knots, etc. The instructions for facial features are under the head section.
R22: Sc 1 in each sc around.
R23: *Sc 2, sc2tog*, repeat around.
R24: *Sc 1, sc2tog*, repeat around.
R25: Sc2tog around.
R26: Sc2tog around.
Finish off.
Facial Features
Eyes
Using black yarn,
I sewed the eyes on right where crochet is in the front loops only. I just "eyed" the locations of the eyes by looking at reference pictures of Snoopy.
Here are my personal specifications (sorry for not using technical terms):
The eyes are 5 "holes" apart from each other.
The eyes are 3 holes long, which means I put the yarn in hole 1, skip a hole, and it comes out of hole 3.
Eyebrows
Using black yarn,
The eyebrows are 2 holes long.
The outside of the eyebrows should vertically match the outside of the eyes
The eyebrows are 2 rows above the eyes.
Nose
Using the nose that you previously crocheted, position it directly center of the face, which is where you first started crocheting, and sew it on with the tail you left on the nose!
Mouth
This is the hardest part of the whole Snoopy. I don't even know where to begin! It would be easier if you have completed the whole face before attempting the mouth.So here are some pictures of my interpretation of Snoopy's mouth.

As you can see, the corner of his mouth lines up with the edge of his eyes.
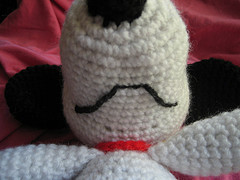
It's like an upside down bird in flight!
Here is a diagram of how I sewed the mouth on, where "^" represents where I pulled the needle up, and "v" is where I pushed it down. The numbers represent the order that I sewed the mouth.
There are 4 places that my needle actually went through; those are: The 2 corners of the mouth, and 2 middle sections (where the straight line starts and ends). I'm not well versed in sewing, so this is my own little ghetto way of doing it. Hehe! Oh, to shape the mouth, I just sewed the yarn down with by inserting the needle through the bottom of closest hole, go up and around, and down through the same hole.

Of course, you can always find your own way of sewing on his mouth.
Ears (make 2)
With black yarn,
Sc 8 in a magic ring.
R1: 2 sc in each sc.
R2: *Sc 7, 2 sc in next sc*, twice.
R3: *Sc 8, 2 sc in next sc*, twice.
R4: *Sc 9, 2 sc in next sc*, twice.
R5: *Sc 10, 2 sc in next sc*, twice.
R6: *Sc 10, sc2tog*, twice.
R7: *Sc 9, sc2tog*, twice.
R8: *Sc 8, sc2tog*, twice.
R9: *Sc 7, sc2tog*, twice.
R10: *Sc 6, sc2tog*, twice.
R11: *Sc 5, sc2tog*, twice.
R12: Sc 1 in each sc around.
R13: Sc 1 in each sc around.
Sl st to join with next sc and finish off, leaving a long tail to sew.
Ears should be flat. You do not need to stuff them. I sewed it 3 rows above the eyebrows.
Body
With white yarn,
Sc 8 in a magic ring.
R1: 2 sc in each sc.
R2: *Sc 1, 2 sc in next sc*, repeat around.
R3: *Sc 2, 2 sc in next sc*, repeat around.
R4: *Sc 3, 2 sc in next sc*, repeat around.
R5: *Sc 4, 2 sc in next sc*, repeat around.
R6 - R7: Sc 1 in each sc around.
R8: *Sc 4, sc2tog*, repeat around.
R9: Sc 1 in each sc around.
R10: *Sc 3, sc2tog*, repeat around.
R11 - R14: Sc 1 in each sc around.
R15: *Sc 2, sc2tog*, repeat around
R16 - R17: Sc 1 in each sc around.
R18: *Sc 1, sc2tog*, repeat around.
Stuff!
R19: *Sc2tog around*
Finish off.
Arms (Make 2)
With white yarn,
Sc 6 in a magic ring.
R1: 2 sc in each sc.
R2: *Sc 5, 2 sc in next sc*, twice.
R3: *Sc 6, 2 sc in next sc*, twice.
R4 - R5: 1 sc in each sc around.
R6: *Sc 6, sc2tog*, twice.
R7 - R8: 1 sc in each sc around.
R9: *Sc 5, sc2tog*, twice.
R10: Sc 1 in each sc around.
R11: *Sc 4, sc2tog*, twice.
R12: Sc 1 in each sc around.
Finish off, leaving a long tail to sew.
Stuff and sew onto body.
Make sure you sew the arm close as you sew them onto the body! I attached the head to the body first, and then I sewed the arms 1 row under where his "neck" is.
This is so that I would have room for his collar!
Legs (Make 2)
With white yarn,
8 sc in a magic ring.
R1: 2 sc in each sc.
R2: *Sc 7, 3 sc in next sc*, twice
R3: 1 sc in each sc.
R4: *Sc 9, 3 sc in next sc*, twice
R5: In back loops only: sc 1 in each sc around.
R6 - R7: 1 sc in each sc around.
R8: In back loops only: sc 6, dc 6, sc 6, hdc 6.
R9: *Sc 2, sc2tog*, repeat around.
R10: In front loops only: *Sc 1, sc2tog*, repeat around.
R11 - R13: Sc 1 in each sc around.
Finish off, leaving a tail to sew onto body.
Stuff, sew onto body. I sewed his legs more towards the front of his body than the sides.
Collar
With red yarn,
Chain as many chains as you need that will ensure a snug collar on Snoopy's neck.
I had 18 chains. Once you have enough chains, finish off and leave a tail for you to be able to tie the collar onto Snoopy. Join the two ends of the collar on Snoopy's neck with whatever method you wish and cut off any extra unsightly tail.
Back dot (I never knew Snoopy had a black dot on his back until I was looking at some pictures of him before I began my project! This is optional.)
With black yarn,
Sc 6 into a magic ring.
R1: 2 sc in each sc.
R2: *Sc 5, 3 sc in next sc*, twice.
Sl st to join. Fasten off. Sew onto the middle of Snoopy's back!
Note by owner of this pattern - Now that you have your Snoopy, I would like to ask you to please, please, please do not sell this pattern.
You can make as many Snoopys as you want and give them to people.
Heck, you can even sell the dolls if you want (referring back to me would be appreciated!).
But the pattern is my first pattern-child and I wanted to give it away for free, so please don't try to profit from it.
With that said, you can share this pattern with as many people as you want.
I know there are many Snoopy lovers out there!
Awesome pattern. A big hit around my house.
ReplyDelete